

Discord Botに必要な情報の取得
1. Discord Developer Portalを開き、Discordアカウントでログインする。
2. アプリケーションを作成(または既存のものを選択)
- 「New Application」ボタンをクリック
- アプリケーション名を入力して作成
CLIENT_IDの取得
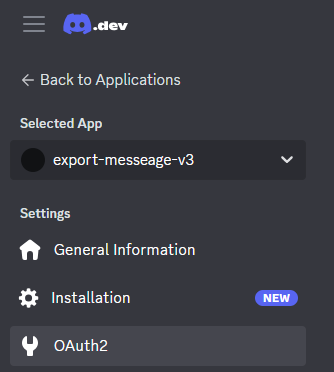
1. 左メニューの「General Information」を選択。
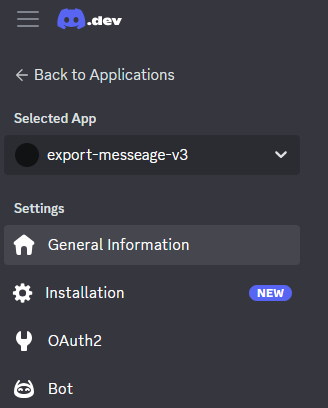
2.「APPLICATION ID」をコピー。
→ これが CLIENT_ID です

DISCORD_TOKENの取得
1. 左メニューの「Bot」を選択
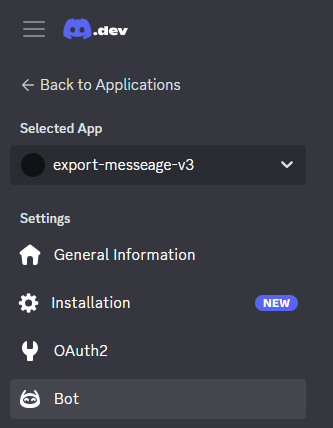
2. 「Reset Token」ボタンをクリック。
初回のみ、以下を実行。
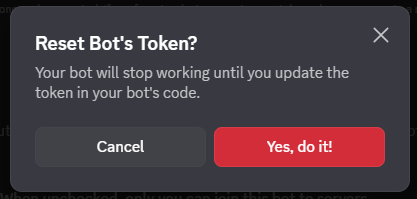
・ボットトークンをリセットする?
→「Yes, do it!」
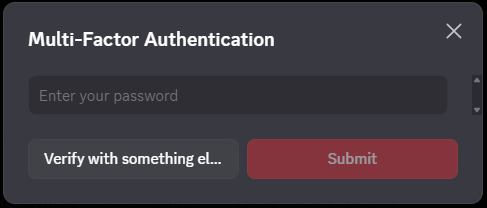
・パスワードを入力してください。
→「パスワードを入力」
→「Submit」

3. 表示されたトークンをコピー。
→ これが DISCORD_TOKEN です。
※このトークンは一度しか表示されないので、
必ず保存してください。

GUILD_IDの取得
1. Discordアプリを開く
2.「ユーザー設定」(歯車アイコン)→「アプリの設定」→「詳細設定」
3.「開発者モード」をオンにする

4. 対象のサーバー(ギルド)を右クリック
5. 「サーバーIDをコピー」を選択。
→ これが GUILD_ID です。
Botをサーバーに招待
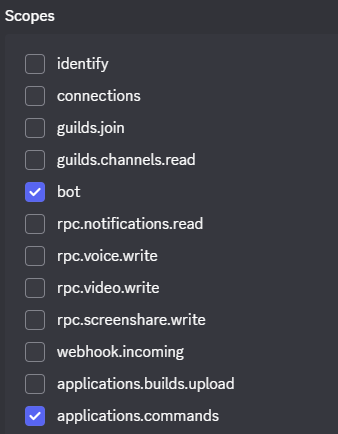
1. Developer Portalの「OAuth2」→「URL Generator」を選択。
2.「SCOPES」で 以下を選択。
→「bot」,「applications.commands」
3. 「BOT PERMISSIONS」で必要な権限を選択。
→こちらを参考に自身が作成した
ボット・スラッシュコマンドに合わせて、
権限設定を行ってください。
4. 一番下にある生成されたURLをブラウザで開き、
サーバーに招待する。
Discordにボット/コマンドを登録
プロジェクトに移動
cd プロジェクト名.envの中を確認
cat .env以下が返される
DISCORD_TOKEN=実際のトークン
CLIENT_ID=実際のクライアントID
GUILD_ID=実際のギルドID
ADMIN_ROLE_NAME=admin //管理者のみコマンド使用可
Discordにボット/コマンドをデプロイ
npm run deploy以下が返される
> [ボット/コマンド名]@[バージョン] deploy
> node deploy-commands.js

✓ コマンド読み込み: [コマンド名]

1個のスラッシュコマンドを登録中...
✅ 1個のスラッシュコマンドを登録しました!
Vercelにボット/コマンドをデプロイ
Vercel CLIのインストール
npm install -g vercel以下が返される
npm warn deprecated path-match@1.2.4: This package is archived and no longer maintained. For support, visit https://github.com/expressjs/express/discussions

added 277 packages in 32s

33 packages are looking for funding
  run `npm fund` for details
Vercelにログインする
vercel login以下が返される
Vercel CLI 48.10.3
> NOTE: The Vercel CLI now collects telemetry regarding usage of the CLI.
> This information is used to shape the CLI roadmap and prioritize features.
> You can learn more, including how to opt-out if you'd not like to participate in this program, by visiting the following URL:
> https://vercel.com/docs/cli/about-telemetry

  Visit vercel.com/device and enter [デバイス認証コード]

  Congratulations! You are now signed in.

  To deploy something, run `vercel`.

  💡 To deploy every commit automatically,
  connect a Git Repository (vercel.link/git).
Vercelに初回デプロイ
vercelいくつか質問に答える
vercel
Vercel CLI 48.10.3
? Set up and deploy “~/[ディレクトリパス]”? ←Yと入力
? Which scope should contain your project? [プロジェクト名] ←Enter
? Link to existing project? ←Nと入力
? What’s your project’s name? [アカウント名] ←そのままEnter
? In which directory is your code located? ./ ←そのままEnter
No framework detected. Default Project Settings:
- Build Command: `npm run vercel-build` or `npm run build`
- Development Command: None
- Install Command: `yarn install`, `pnpm install`, `npm install`, or `bun install`
- Output Directory: `public` if it exists, or `.`
? Want to modify these settings? ←Nと入力
? Do you want to change additional project settings? ←Nと入力
🔗  Linked to enakat7s-projects/export-messages-ver3-0-0 (created .vercel and added it to .gitignore)
? Detected a repository. Connect it to this project? ←Yと入力
> Connecting GitHub repository: https://github.com/[Githubアカウント名]/[リポジトリ名]
> Connected
🔍  Inspect: https://vercel.com/enakat7s-projects/export-messages-ver3-0-0/7UWe3Ej6jnaqzzT9snreZvzogi3N [3s]
✅  Production: https://export-messages-ver3-0-0-77ya49xaw-enakat7s-projects.vercel.app [3s]
📝  Deployed to production. Run `vercel --prod` to overwrite later (https://vercel.link/2F).
💡  To change the domain or build command, go to https://vercel.com/[プロジェクト名]/[ディレクトリ名]/settings
プロジェクトのリンク
今回はメインPCで初回デプロイを行い、サブPCで環境変数を設定しようとしています。
1つの端末で設定を行う場合、この工程を飛ばし、次へ進んでください。
vercel link質問に答える
Vercel CLI 48.10.4
? Set up “~/[ディレクトリパス]”? ←Yと入力
? Which scope should contain your project? ←アカウントを選択
? Found project “[アカウント名]/[プロジェクト名]”. Link to it? ←Yと入力
✅  Linked to [アカウント名]/[プロジェクト名] (created .vercel and added it to .gitignore)
環境変数の設定
DISCORD_PUBLIC_KEYの設定
vercel env add DISCORD_PUBLIC_KEY以下が返されるので、パブリックキーを入力。
DISCORD_PUBLIC_KEY
Vercel CLI 48.10.4
? What's the value of DISCORD_PUBLIC_KEY? [パブリックキー]
次の質問では、上下キーで移動し、スペースキーでチェックを入れる。
3つすべてチェックしてください。
その後、Enterを押す。
DISCORD_PUBLIC_KEY
Vercel CLI 48.10.4
? What's the value of DISCORD_PUBLIC_KEY? [パブリックキー]
? Add DISCORD_PUBLIC_KEY to which Environments (select multiple)? (Press <space> to select, <a> to toggle all, <i> to invert selection, and <enter> to proceed)
❯◉ Production
 ◉ Preview
 ◉ Development
最終的に以下が返されたらOK。
Vercel CLI 48.10.4
? What's the value of DISCORD_PUBLIC_KEY? [パブリックキー]
? Add DISCORD_PUBLIC_KEY to which Environments (select multiple)? Production, Preview, Development
✅  Added Environment Variable DISCORD_PUBLIC_KEY to Project [プロジェクト名]
他3つの環境変数もDISCORD_PUBLIC_KEYの設定と同様の設定を行う。
DISCORD_TOKENの設定
vercel env add DISCORD_TOKENCLIENT_IDの設定
vercel env add CLIENT_IDADMIN_ROLE_NAMEの設定
vercel env add ADMIN_ROLE_NAME環境変数を反映させる
vercel --prodデプロイが完了すると、本番環境のURLが表示されます。
https://[プロジェクト名].vercel.app
Discordの設定
デプロイが完了したら、以下の手順でDiscord側の設定を行います。
1. Discord Developer Portalを開く。
2. General Informationタブを開く。
3. INTERACTIONS ENDPOINT URLに以下を入力。
https://[プロジェクト名].vercel.app/api/discord
実際の機能をapi/discord.jsにすべて統合
すべての機能をdiscord.jsに統合した後、以下を実行。
vercel --prodその後、discordで実際にコマンドを実行する。
注意
私のように、テスト開発だからとすべて無料でやろうとすると限界が来ます。
Vercelの無料枠ではタイムアウト上限が10秒です。
どうも、リクエストの遅延で3~5秒かかってるみたいで…
ほとんどの処理(メッセージの取得・ファイル出力)が出来なかったです。
出来た処理といえば、チャンネルの取得くらいですね~。
コマンドを送信して、チャンネルの取得後に返ってくるはずの
「コマンドは正常に受信されました。」も来ず…。
でも、vercelのリクエスト上限は近づいてくるんですね~
レストランで料理を注文したのに、料理が提供されず、帰れと言われているものです。
FireBaseでサーバレスができるか分からないけど、そっちでやってみようと思います。

コメント